Phonto Tutorial #1- Making a Template
Hey friends!
A lot of my Instagram followers have always asked me how I make my quote graphics.
Check one out below...
They always ask me about the fonts I use and how I add the blue (or pink, green, purple, or yellow) outline. I use my branded colors for these quotes :)
Well, in this post, I will show you how to make your own template to add anything you'd like!
I cannot take full credit in finding this app. I found it while doing a free challenge from Tabitha Carro. She is the master of all things techy and marketing with your phone. I would highly recommend you check her out and her Smartphone Marketing School. She can teach you a million new things!
I used to create photos using her challenge with other colors and a whole other vibe, but after I rebranded, I changed the whole look to this simple, clean look. I love it!
I use fonts by Amy Groesbeck. The script font is called Boss Lady and the other font is called I Can't. I love those names and I LOVE her fonts. I have the bundle and it's one of the best choices I made.
OK, OK...
I know you're here to learn how to make the template, so let's do it!

1. Download and open the Phonto App
It is the red app at the bottom :) IT IS FREE!

2. Open it up! Click on the little camera at the bottom.

3. Click Plain Image

4. Now is where you have to make your first decision. Do you want a black background? Do you want a white background? Find one here that you like. I picked the white background on the top. Click the one you would like to use.

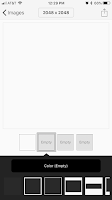
5. If you want a different color, you can always change it here by clicking color.

6. Now you will click the second box that says empty. Click COLOR EMPTY.

7.Pick a color you'd like by swiping the colors to the left and selecting your choice. If you have a business, I would suggest that you pick a color that goes with your brand.
Click apply.

Bonus Tip: When picking a color, you can always save it. Click a color, click the three lines on the right of the colors and hit save at the top of the black section. It will save your colors. If you know the exact Hex color code or RBG code, hit the square with pencil on the top right to add your exact colors. Save. Hit apply once you've picked a color.
You can learn about finding the HEX code from Tabitha's free challenge!
9. I chose to use my branded color of pink.
Click apply in the upper right hand side.
10. Now that you have a color, you can swipe through the bottom design choices. Do you want one column of color? A square? A circle?
Choose what you like. I use the one that does a small outline of pink on the edges. Hit the icon at the top right. Click save.
11. Now what you've created will be saved in My Templates.
You can get to this from PLAIN IMAGE menu at the very beginning.
If you want to create several colors for templates, you can click the pink one, change the color, click save. Every one you make will be saved in MY TEMPLATES.
12. You can now use your templates. Go to MY TEMPLATES. Click one. Click use.
Write anything you'd like by clicking on the graphic and hit add text.
I really hope this helps. I am bad at explaining things, but I'm hoping the pictures help you. This is how I do it. I don't really make new templates because I've just been using these ones over and over again. Please experiment and see what you like. Sometimes you change your mind and that's ok!
HAVE FUN!
Please comment any questions or follow me at @learningandlovingit on FB or Instagram and message me if you have a question!
Thank you for reading! I will be following up this post with how to add your own fonts into Phonto to use on your graphics. Stay Tuned!


Comments
Post a Comment